Tag Archives: recipe

Instant Pot spaghetti and meatballs

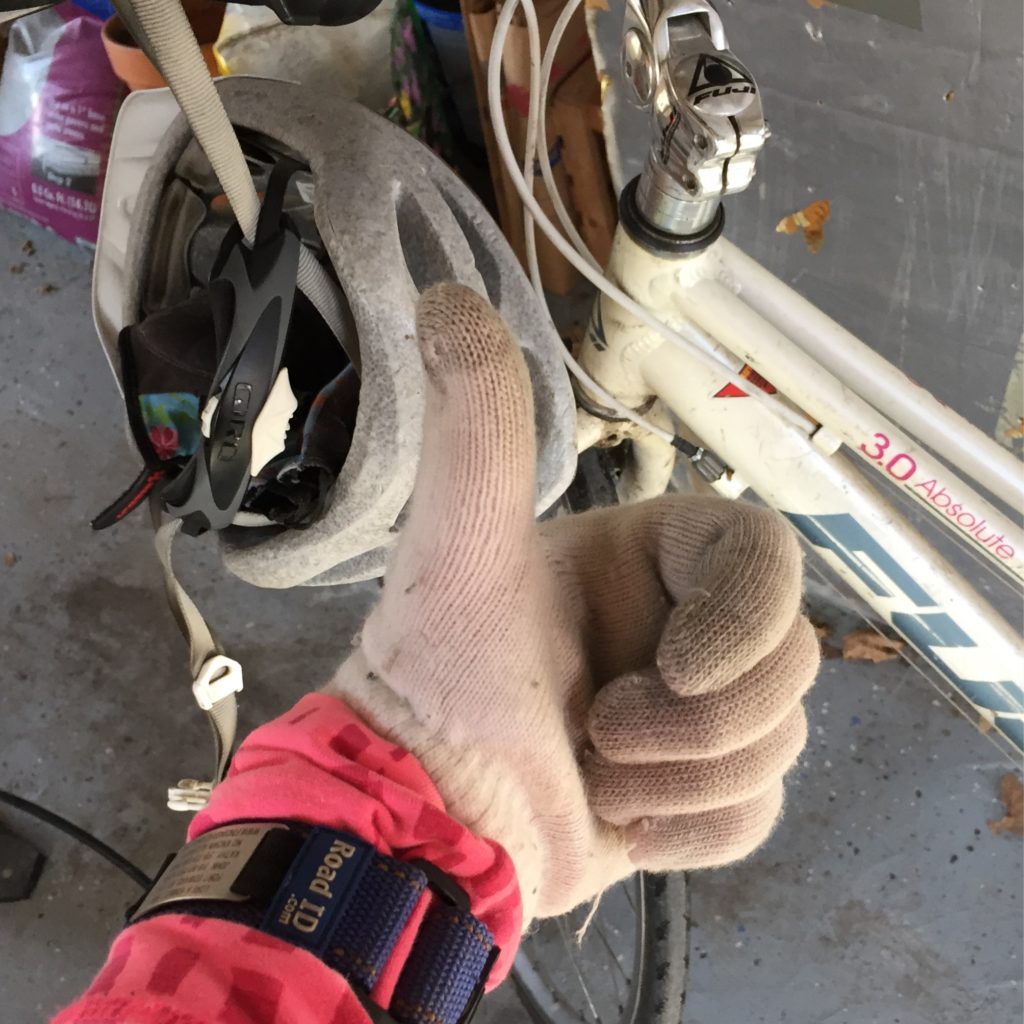
The run of warmer weather continues. 55 degrees and back on the bike again!

Snow will be here Friday, though. Yuck.

I found an article featuring IP recipes with 5 ingredients or less and bookmarked a few. This one is for spaghetti and meatballs. It takes pretty much as long from start to finish as stovetop, but there is only one pot and you don’t have to watch or drain the pasta.

4 ingredients (unpictured olive oil)

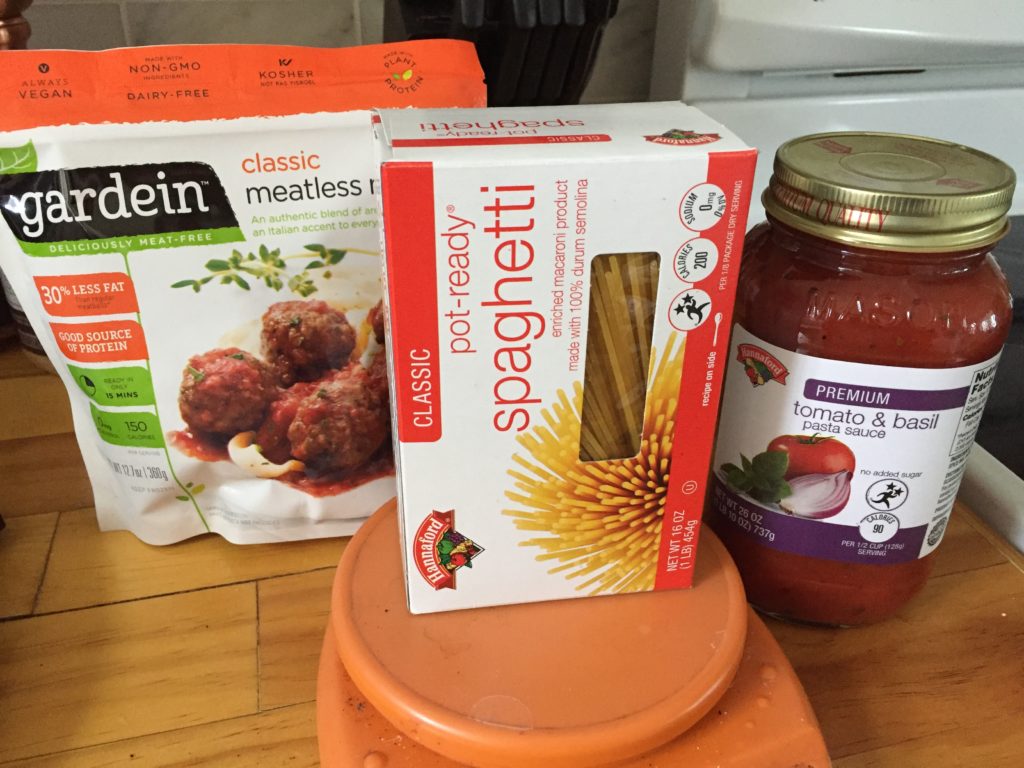
The recipe calls for 1 pound of frozen meatballs, but the veggie ones are 12 oz bags. Good enough!

  • One 1-pound bag of frozen meatballs (homemade or not)
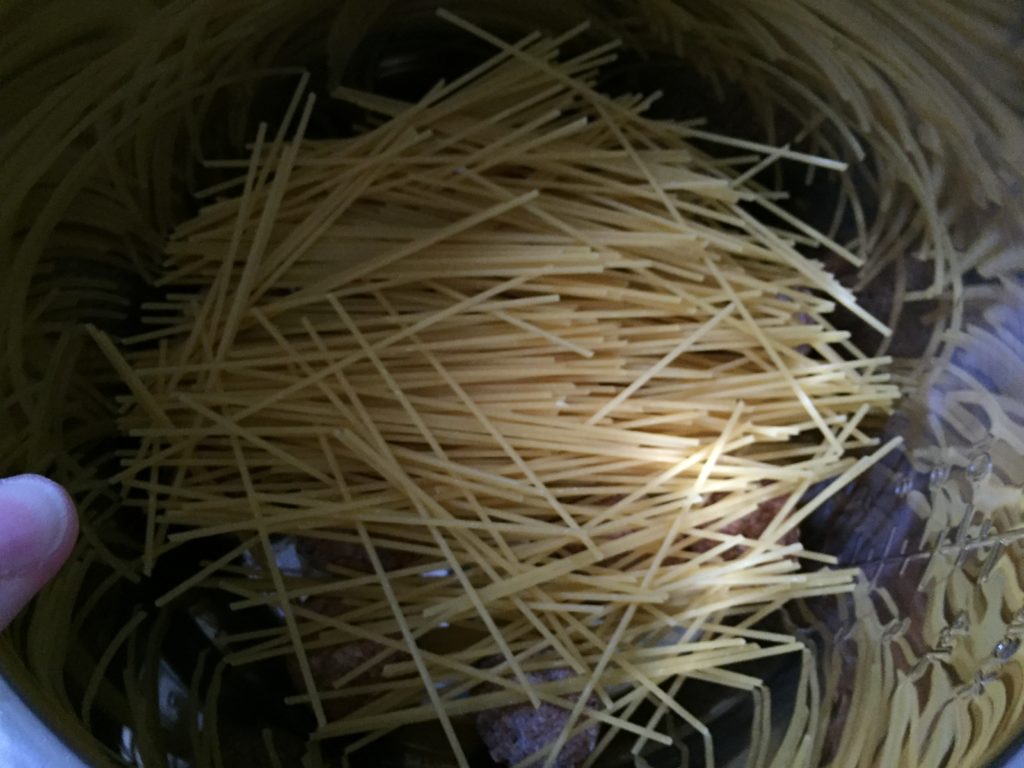
  • 8 oz of spaghetti, broken in half
  • One 24 ounce jar of pasta sauce
  • 1 tbsp of olive oil
  • 2 cups of water (the recipe called for 3, but after reading all the comments, it sounds like 2 gave better results.)

.

Put the meatballs in the bottom of the IP and then the spaghetti.  Drizzle the pasta with the olive oil.

.

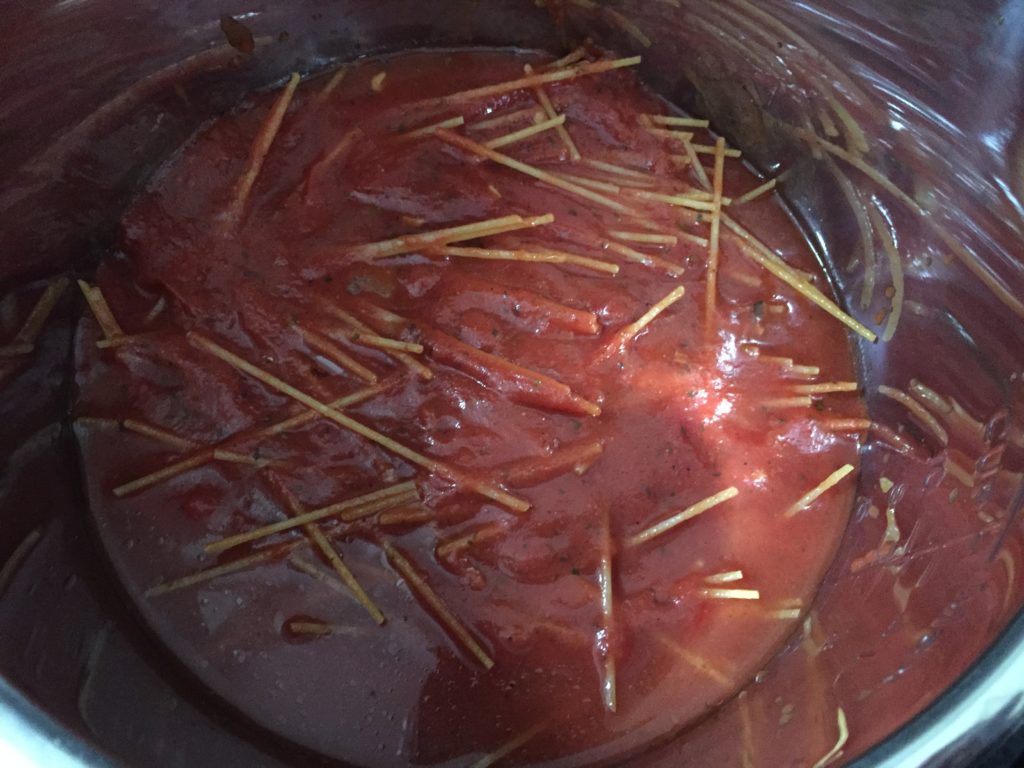
Next add the sauce and the water, and push everything down so the noodles are covered as much as possible.

Honestly, I don’t know why you couldn’t put the meatballs on top, which would keep the pasta down. Maybe next time.

Set the IP to manual, high pressure and 10 minutes – yes, I know this says low pressure LOL.

When I think about it, I will heat up any liquid that goes into the IP to help speed along the pressurizing time. I didn’t do that today and it took about 12 minutes for the pot to come to pressure and then the 10 minute cook time.

After the cooking is done, use the quick release and give everything a stir. At first it seemed a little liquidy, but with stirring ended up like this:

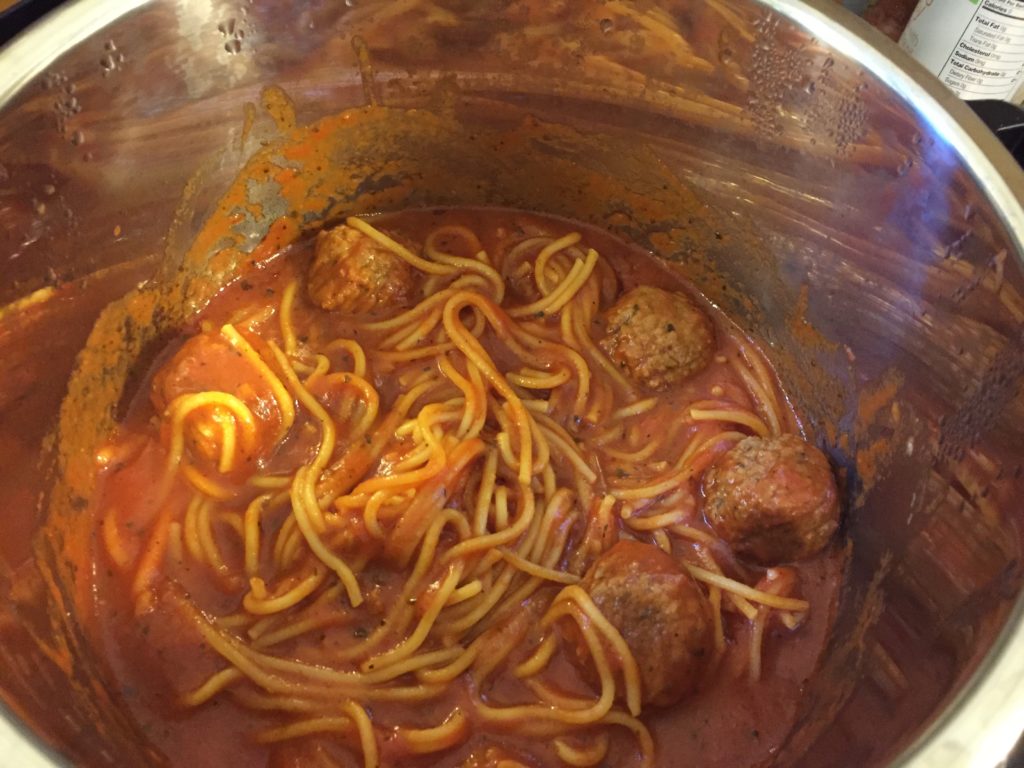
I was pretty happy with that! This was a nice al dente pasta.

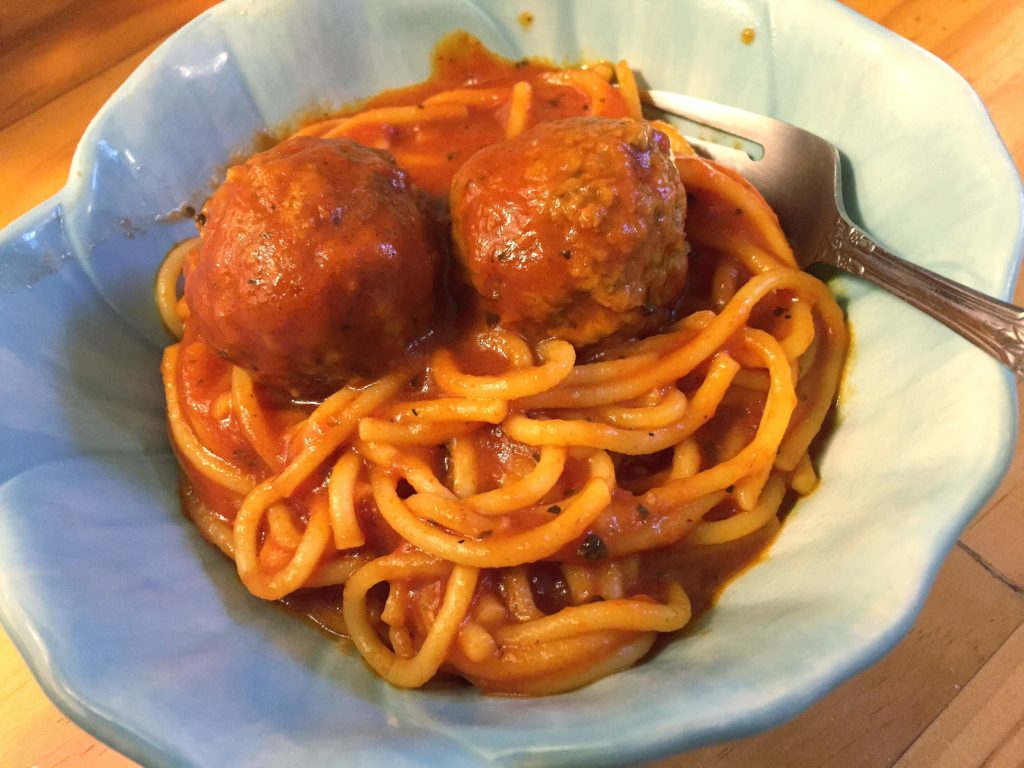
While not a time saver, it was great to just dump all this in the pot and turn it on. No pasta draining or sauce heating or meatball cooking. Only one pot to clean, which can go in the dishwasher – woo hoo!! Not to mention leftovers for another meal.

Still happy with the Instant Pot!

Pressure Cooker beef stew

I pulled out the pressure cooker for the first time in a long time. John actually uses it more than I do, mostly for sweet potatoes and pumpkin.  Anyway, I have been craving beef stew for quite a while now and finally got around to doing this. I was going to use the slow cooker, but that takes all day for beef stew, and I figured I would do something different.

IMG_2006


Anyhoo, this recipe comes from the book I got from the library that I mentioned last week Cook it Slow, Cook it Fast from Mr. Food Test Kitchen. This book has a lot of yummy sounding recipes in it, too. This is the Quick as a Wink Beef stew.  It’s not actually quick as a wink, but for stew it’s pretty fast LOL.

Ingredients:

  • 1/4 cup flour
  • 1/4  tsp black pepper
  • 1 tsp salt
  • 1 to 1.5 pounds of stew beef, cut into 1 inch cubes (it calls for 2 pounds, but I got this size package)
  • 1 tablespoon oil – I used coconut
  • 1/4 cup of chopped onion
  • 2 pounds of potatoes cut into large cubes
  • 2 to 3 carrots cut into chunks
  • 1.5 cups of broth
  • A 15 ounce can of diced tomatoes with juice
  • 1/2 teaspoon of browing agent

I cheated a little and used frozen carrots:

IMG_2008

and onions for that matter…

In a bowl, mix the flour, salt and pepper. Add the meat and toss to coat. In the pressure cooker, add the oil and brown the meat for 5 minutes or so. I like to do this in a couple batches. If you have too much meat in the pan, you end up steaming the meat because of the liquid. 

IMG_2010

Then add in all the rest of the ingredients except for the browning agent.

IMG_2012b

Cover and bring to pressure. It takes a few minutes to come up to pressure, but the indicator will pop up like this:

IMG_2013b

Or whatever indicator the pot has. Now turn the heat down to medium low and maintain pressure for 8 minutes. If the button falls down, the heat is too low and you have to bring it back up to pressure. The nice thing about current pressure cookers is that they are safe. No more blowing lids and peeling your dinner off the ceiling. They have a pressure release valve that will automatically release pressure if it gets too high. I have seen that in action, so I know it works.

Anyway, after 8 minutes, do a natural release, which is removing the pressure cooker from the heat and letting the pressure come down on its own. It took about 10 minutes or so for me. The little button will fall back down.  

IMG_2014

(FYI – a quick release is where you turn the knob to the steam vent setting and it will release the steam all at once. It’s pretty loud when it does that, but it only takes about 30 seconds.) Then carefully open the lid.  Now for the browning agent. 

IMG_2007

This is a suprisingly flavorful add in, plus it darkens the color. You don’t need much, just 1/2 a teaspoon.

IMG_2015b

Yum, right? Then serve!

IMG_2017b

The nice thing about the pressure cooker is that it makes the meat really, really tender, but not mushy. I love the slow cooker, but sometimes the pressure cooker seems a little more fresh tasting, if that makes sense. Because of the shorter cooking time.

Since John is a vegetarian, obviously he will not be eating any of this, so I am set for a fair number of meals LOL. Unless anyone wants to come over and have some!

What do you cook in the pressure cooker?

Slow cooker overnight Apple Cinnamon Oats


Another oatmeal recipe! I really like cooking steel cut oats in the crockpot. It’s nice to wake up to breakfast ready to go and using the water bath method, you don’t have to worry about the oats getting overcooked or burned.  Not to mention it gets you a few breakfasts! This is very similar to the pumpkin slow cooker oats and is a version of the Yummy Life’s oats.

Ingredients:


  • 1 cup of steel cut oats (not the rolled oats)
  • 1 cup unsweetened almond milk (you could just do water or regular milk for a bit of creaminess)
  • 2 cups of water
  • 2 teaspoons of cinnamon
  • 2 medium apples, peeled and chopped. I used Pink Ladies. You want a firmer apple like a good pie apple.
  • 40 grams of dried cranberries
  • 2 tablespoons of brown sugar
  • pinch of salt

Again this is using the water bath method. This means using a casserole dish that fits inside your slow cooker. I used a wad of tinfoil to raise the casserole dish off of the bottom of the crockpot just a bit.  Spray the casserole dish with cooking spray and add all the ingredients to it. Stir. Then put in the crockpot. Carefully fill the space between the slow cooker and casserole dish with water until it comes up about halfway up the sides of the casserole dish. Not too high or it can bubble and spill into your dish.

water bath for oats

Cover, set on low and let it cook overnight. I have let this go for as long as a bit over 8 hours and it has been fine. The water bath keeps you from having to worry about it.


WP_20160102_001

Now, the apples will have floated to the top. Just give everything a good stir and serve!

oats

I topped mine with a few toasted pecans and some maple cream. Yum!

This makes 4 good sized serving (1 cup+)

Nutrition: Calories:  210; fat 6 grams, carbs 40 grams, fiber 6 grams, protein 6 grams.

I love the slow cooker oats. The steel cut have such a nice texture to them. The oats are easy to reheat. Just add a a couple tablespoons of water to a serving and heat in the microwave for a minute, stir really well to break up lumps and heat again until hot, maybe another minute and a half or two.

Homemade Hamburger Helper

This weather is the absolute craziest thing. Today, I saw a rainbow! It was raining and I was heading out to get my hair cut. There was a break in the clouds and a rainbow appeared! I almost stopped to get a picture and wish I had because it was not as bright for this shot:

rainbow rainbow2

Never in my life have I ever seen a rainbow in December. Anyway, on to the subject at hand. 

We used to eat a lot of Hamburger Helper growing up. I actually liked it a lot. Especially the cheeseburger macaroni.  For whatever reason, I got thinking about that again – even though I haven’t had it in probably 20 years. I don’t think John and I ever made an HH meal.  Of course, I realized that it would taste totally processed and not at all like I would remember it tasting. But what if I could recreate that at home? Turns out the internet is pretty handy to find stuff like that 😀  There is a section on food.com dedicated to these knockoffs. I found my cheeseburger hamburger helper. The great part is this is a 1 pot meal! 

  • 1 pound of ground beef (I used Morningstar Crumbles to make it veggie for John)
  • 1 cup of water
  • 2 cups of milk
  • 1-1/2 cups of elbow macaroni (or any pasta of choice)
  • 1 tablespoon cornstarch
  • 2 teaspoons paprika
  • 1 teaspoon onion powder (I used a couple tablespoons of of minced onion)
  • 1 teaspoon garlic powder
  • 1 teaspoon salt
  • 1 teaspoon sugar
  • 1 cup of shredded cheddar cheese

Brown the meat in a large saucepan and drain the fat (if there is any). Add all of the rest of the ingredients except the shredded cheese to the pot, mix well and bring to a boil. Reduce heat, cover and simmer for about 10 minutes  (larger pasta may need more time). Mix in the cheese and cook for another 2 minutes covered. Remove from the heat and let the pot sit for 5 minutes.  Then serve!

cheeseburger helper

Okay, maybe not super attractive, but this was really tasty! You could sub in any type of meat like ground turkey or pork (or the veggie crumbles), vary up the cheese or the pasta shapes. That site also had versions of the other kinds of Hamburger Helper as well like the stroganoff, so we will have to try those as well! 

Any other people grow up with Hamburger Helper? 

Pumpkin Mug Cake with Coconut Flour

I have steered away from microwave mug cakes forever after trying a bunch of protein ones and finding them to be dry and sponge-like.  I do like the 1-minute muffin, which doesn’t call for protein powder, so the texture is better.  I also like the banana bread breakfast pudding made with coconut flour, which I had done with pumpkin as well and so when I saw a recipe pop up in my pinterest feed, I decided to take another look at it.  I had everything on hand, so I whipped it up.  I calculated calories for hers and it was almost 500, which is just too much for me on a normal day. Maybe on a long ride day for breakfast or something, but not on the regular.  It called for 2 tablespoons of coconut oil. I really don’t think any small recipe needs that much oil in it, so I was going to sub with half applesauce, but then just figured I would do the whole thing with applesauce instead of the oil, cutting almost 200 calories off the top.


mug cake

Based on this recipe

Ingredients:

  • 1 egg
  • 2 tablespoons of pumpkin puree
  • 2 tablespoons of unsweetened applesauce
  • 1-1/2 tablespoons of maple syrup (the real stuff please)
  • 2 tablespoons of  coconut flour (14 grams)
  • 1/2 tsp of baking powder
  • 1/2 tsp of pumpkin pie spice or cinnamon

You could probably mix all this in the mug, but I wanted to spray the mug with cooking spray, so I got a bowl messy.  Mix all of the wet ingredients first.

IMG_1180

I have a tiny sifter that I use for the coconut oil and the baking powder. Both of these ingredients get clumpy, so I find this to be an easy solution.  I lay the sifter on the bowl and put it on the scale to measure out the coconut flour.

IMG_1181b

Mix up and scoop the batter into your mug.  A 10 – 12 ounce mug should be fine. It’s somewhat dense and doesn’t rise a ton.

IMG_1182

Microwave for 3 to 3-1/2 minutes. Start checking after 2-1/2 minutes to make sure it is done. You will see it fully cooked through the top when it is done.

Boom.

IMG_1183

Then I defeated the purpose and put in on a plate because I wanted a better picture.  I topped this with half a tablespoon of butterscotch chips. The chips are getting nice and melty here, too – yay!

mug cake

The verdict?  Pretty good!  It tastes like pumpkin pie. Almost a pumpkin muffin, but more moist.  I had this for lunch actually 😀  I think it would make a good breakfast or maybe a dessert.  It was surpringly filling, which I tend to find when I have any coconut flour item. 

mug cake

Nutrition:  Calories 239; carbohydrates 35 g; fat 7 g; protein 9 g; fiber 6 g.   That is without the butterscoth chips. That added 40 more calories to my serving.

Notes:  If you don’t have real maple syrup (the horror), sub another liquid sweetener in it like honey. The coconut flour needs a lot of moisture so using something like brown sugar would probably make the batter too thick.

Recipe: Dutch Baby Pancake

I was looking for a quick recipe to make Saturday morning and I felt like baking, but didn’t want muffins or something like that.  Then I ran across the Betty Crocker recipe for a Dutch Baby.  I had forgotten how easy these are to make.  It’s a cross between a popover and a pancake and the term originates from the Pennsylvania Dutch, although the origins of the pancake appear to be in the Pacific NW (thanks Wikipedia!).

Dutch Baby

Anyway, you can make them sweet or not.  I chose not to for this recipe from Betty Crocker, although with a different cooking technique.

Ingredients:

  • 2 eggs (room temperature)
  • 1/2 cup of milk (warmed)
  • 1/2 cup of flour
  • 1/4 tsp of salt
  • fresh ground nutmeg
  • 2 tablespoons of butter, cut into pieces

The first thing you want to do is set your oven to 475 F and put in a 10-inch cast iron skillet.

WP_20150829_002


While this is heating up, you can assemble the batter.  It doesn’t take long.  In the list above, the room temp eggs and warmed milk will help make a puffier pancake.  I put the eggs in a bowl of warm water for a few minutes and then heated up the milk for about 30 seconds in the microwave.   In a small bowl, mix together the flour, salt and nutmeg.

In a larger bowl, add the eggs and whisk until fluffy and light in color.

WP_20150829_003

Stir in the milk.   Your oven has probably reached the preheat of 475 by now.  Once it has, open the oven door and put the butter pieces in the pan:

WP_20150829_004

Now add the flour mixture to the batter and whisk to combine:

WP_20150829_005

Carefully pour this batter into the skillet.  I removed it from the oven to do this (remember the handle is HOT!)

WP_20150829_006


Reduce the oven heat to 425 F and return the pan to the oven.  Cook for about 12 minutes until puffed and golden:

Dutch baby

It puffs up so much!  Too bad it won’t stay like that.  It does deflate as it cools.  Cut into wedges and serve however you like.  Many people do lemon and powdered sugar.  You could do maple syrup, fruit, or even bacon and cheese since this one isn’t sweet.  I chose to put an apple topping on ours:

Dutch baby

It tastes like a cross between a crepe and a pancake and is really good.  It probably took 20-25 minutes from start to finish, so not long for a weekend breakfast.

Nutrition:  The entire dutch baby has 590 calories (made with 2% milk).  So, if served into 4 slices –  that is 145 calories per wedge.

Riding and summer squash

The hot sweltering weather is gone for now and it has been really nice out.  I took a nice long ride this morning.  Work was slow, so that allowed me a longer ride.

This is me 16.5 miles later:

me

This ride took me about 80 minutes. The neighbors probably were wondering what I was doing trying to balance the bike on my hip and get the angle of the picture right 😀

I wanted to share this fun little project.  I am always on the look out for repurposed stuff for the garden and I saw a picture on Pinterest to recreate.  I always scope out garage sales and thrift shops looking for cheap dishes and cups for this stuff.  They don’t have to match, but this set did.

cup and saucer


 I just used this stuff to glue the cup to the saucer:

WP_20150723_005

Then hung it on a hook.  

cup and saucer

I am concerned about squirrels putting their weight on this, so I filled it with niger seed, which the squirrels are not interested in.  Hopefully the birdies will find it soon. It seems to take a couple weeks before they notice a new feeder. At least it is cute to look at anyway.

So you know I am trying to eat different veggies this month.  We were at the farmer’s market this weekend and I picked up some yellow squash.  They look good, don’t they?

WP_20150718_003

I preheated the oven to 400 F.  Then I sliced the squash into 1/2 inch slices and put them on a nonstick mat.  Then I sprayed the tops with cooking spray, salt and pepper and distributed 1/2 ounce of parmesan cheese over the top:

WP_20150723_008

Bake for about 20 minutes or so until the squash is tender and the cheese is melty and a little browned.

WP_20150723_009


Dinner is served!

WP_20150723_011

The squash was quite good this way.

baked squash


The yellow squash seems to be a lot softer than a zuchinni.  I think I might next want to try it in a quiche.  What is your favorite way to eat squash?

Recipe: Lemon Ricotta Pancakes

So, I managed to try a new recipe, Lemon Ricotta Pancakes!  

Lemon Ricotta Pancakes

There are a lot of recipes online for this, and all are basically a variant of below (like this one).

Ingredients:

  • 1-1/2 cups all-purpose flour   
  • 1 tsp baking soda   (I made an oops and used baking powder, so I guess either will work)
  • 1/2 tsp  salt   
  • 1 cup low-fat buttermilk   
  •   2 large eggs, yolks and whites separated   
  • 2 Tbsp sugar   
  • 1 Tbsp lemon zest, or increase to taste  
  • 1 Tbsp of lemon juice 
  • 1/2 cup part-skim ricotta cheese   

WP_20150612_002

In a small bowl, mix together the flour, baking soda and salt. In a larger bowl use an electric mixer to whip the egg whites into soft peaks.  I got to use my fancy copper bowl that my in-laws gave me for Christmas to do my egg whites!

WP_20150612_001

In another large bowl, mix together the buttermilk, sugar, egg yolks, lemon zest, lemon juice and ricotta cheese.  Stir in the flour mixture until moistened.

WP_20150612_003


Then fold in the egg whites.

WP_20150612_004

You don’t want to stir this too much. Just incorporate the egg whites by folding the batter over and over.

WP_20150612_005

Now heat up a griddle or frying pan on medium heat (you could do this while stirring the batter).  You definitely want medium heat to cook these as if you do it higher, the outside will overcook while the middle will be raw.  It’s a dense batter.

Use a 1/4 cup measuring cup and deposit 1/4 cup of batter into the pan after you have sprayed with cooking spray.

WP_20150612_006

These will bubble some, but not like regular pancakes do. Just lift the bottom and check for doneness. It took 2-3 minutes on each side for my cakes.  You should get pretty much exactly 12 pancakes out of this batch.

And serve topped however you would like:

WP_20150612_008

I topped mine with my favorite blueberry topping, which goes really well with lemon anything.

The verdict?  Very, very tasty!  They were definitely heavier than regular pancakes and have more of a velvety texture to them. Two pancakes are surprisingly filling.  These also make good leftovers. I just stored them in the fridge and popped them into the toaster oven to reheat.

Nutrition: Each serving of 2 pancakes (without any topping) has 214 calories, 36 grams of carbs, 4 grams of fat, 9 grams of protein and 1 gram of fiber.

Tips:

– If you don’t have buttermilk, just add about 1 tsp of lemon juice to 8 ounces of milk. 

– This recipe makes a fair number of dishes and time to cook all the batter. It’s great to do on a day off because the leftovers are easy to reheat.

– Don’t overwhip the egg whites and make stiff peaks or the batter will be too thick. You can thin it out with some more lemon juice or water.

Tamale Pie

I have been wanting to make this recipe for a while, but couldn’t settle on one in particular. I love tamales and a lot of the recipes had cornbread on top, which isn’t quite a tamale to me.  I made a mishmash of a several recipes and then made it vegetarian so that John could partake in it as well. You could sub ground turkey or beef.

WP_20150430_001


For the filling:

  • 1 tablespoon of oil
  • 1/2 cup of chopped bell peppers
  • 1/4 cup of chopped onions
  • 12 ounces (1 package) of Grillers Crumbles or ground turkey/beef
  • 1 can (15 oz) of petite diced tomatoes, drained
  • 1 can (2 oz) of diced green chilis
  • 1/2 cup of corn kernels (fresh or frozen)
  • 1/4 teaspoon of cayenne pepper
  • 1/2 teaspoon oregano
  • 1/2 teaspoon chili powder
  • 1/2 teaspoon ground cumin
  • salt and pepper to taste

For the tamale topping:

  • 3/4 cup of cornmeal
  • 2 cups of water
  • 1/2 tsp salt
  • 1/2 tsp of chili powder
  • 1 tablespoon of butter
  • 1/2 cup shredded cheese (hold for later)

Preheat oven to 375 F.  In a large saute pan, saute the onion and pepper in the tablespoon of oil until soft. Then add the veggie crumbles (or meat).

WP_20150430_002

If you are using meat, you would want to brown it at this stage. I just needed to heat up the crumbles since they are precooked.  Then add the diced tomatoes, diced chilis, corn, oregano, chili powder, cumin, and cayenne pepper.

WP_20150430_003

Stir to combine and simmer over medium-high heat while you prepare the cornmeal.  No pictures of this step (John was making this while I did the filling), but just bring the water to a boil in the saucepan, whisk in the cornmeal, the salt and the cayenne pepper. Remove from heat and stir in the 1 tablespoon of butter. Set aside.

Now you have a bubbly filling:

WP_20150430_004

Taste this for salt and pepper seasoning and adjust.  This is actually pretty good itself just to put in a bowl and sprinkle some cheese on it 😀  Pour this into a 9×9 pan sprayed with cooking spray.

WP_20150430_005

Pour the cornmeal on top:

WP_20150430_006

Now it is ready for the oven:

WP_20150430_007

Bake at 375 F for about 30 minutes.  It will be bubbling hot. Remove from the oven and sprinkle the shredded cheese on top and let it sit for about 10 minutes before eating to thicken up – and cool. It’s very hot!

WP_20150430_008

This will let it thicken up just a bit.  Then serve!

Tamale Pie


The verdict? This was pretty tasty!  What I really liked about it was that the cornmeal was still soft like a tamale is and not like cornbread.  Although I think that would be an interesting variation to try.


The nutritional stats are good on this as well.  Of course, this is using the veggie crumbles, which are a little bit less than turkey.

If divided into 6 servings (shown above): 246 calories, 25 grams of carbs, 11 grams of fat, 15 grams of protein, 5 grams of fiber

I was actually pretty hungry, so I had another half serving with this and now I am full 😀  I bet the leftovers will be really good, too!

Recipe: Potato- crusted quiche

Here is the potato-crusted quiche recipe that John made. He made it for the family dinner and he also made it this week for the two of us.  The nice thing? While he was making it he took some pictures so that I could put them on the blog with the recipe.  What a good husband 😀

potato crusted quiche

I really like quiche, but I am not a huge fan of the pie crust. The crust is usually the part that is problematic in quiches – or fruit pies, for that matter.  The solution? Use potatoes!  This also makes it gluten free. Anyway, this is the recipe that John based his version on from Food Network.

Ingredients:

  • 2 medium-sized russet potatoes, peeled
  • 3 tablespoons  oil
  • salt and pepper
  • 4 whole eggs
  • 1.5 cups of milk
  • 1/2 cup of half and half
  • Pinch of  nutmeg
  • 6 ounces of smoked gruyere cheese (or cheese of choice, but smoked is awesome!)

Preheat the oven to 450 F.
Using a mandolin (or you could use a knife), slice the potato into thin rounds. I also realized that you could use the spiralizer on the chipper blade to make these as well.

potatoes


Add the oil to the bowl and coat the potato slices.  Arrange in a single layer on a baking sheet and sprinkle with salt and pepper. Bake for 10 to 15 minutes until the potatoes are soft. You don’t want them crispy.

IMG_0278


While the potatoes are cooking, whisk together the eggs, milk, half and half, nutmeg, salt and pepper.
IMG_0276

Then stir in 3/4 of the  shredded cheese (reserving about 1/2 a cup):

IMG_0277


Set aside while you make the crust.  Once the potatoes are soft, use the potatoes to line a 9 inch pie plate with overlapping slices to look like a pie crust (sorry, no pic of this part).  *Reduce oven to 350 F at this point*

Then pour in the egg mixture into the pie plate and top the mixture with the remaining cheese. Place the pie plate onto a baking pan and bake in the oven (set at 350) for 40 to 50 minutes until the center is set (test with a knife – if it comes out clean, you are done.)

IMG_0279


Let this cool for 15 or 20 minutes before serving if you can.

Potato Crusted  Quiche


This is really, really good. I actually don’t know if I would do the potatoes over the edge of the pie plate again as they get a little hard during baking, but I love, love the potatoes as crust.

Here was the other one he made and the potatoes were crispier.

quiche


If cut into 6 slices, this is about 300 calories. Cut into 8 slices and it is about 250 per slice. Of course, this will depend on the type of cheese you use and the milk.  The picture at the top of the page is about 1/8th. Leftovers are great with this as well. This is definitely going to be in our regular meal rotation – and it is officially John’s job now 😀